.
.
How to Access Recruitment:
●Go to Dashboard>Recruitment.
●You will find the Recruitment overview page.
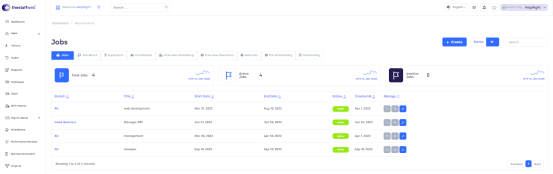
Figure 01.
It has different components:
.
.
Jobs:
.
On the jobs overview page you will find various options like:
.
❖Total jobs: total number of jobs
❖Active jobs: it tells, how many jobs are active
❖Inactive jobs: it describes how many jobs are inactive.
.
Branch: it is the specific branch of a company related to the Job.
Title: title of the job.
Start date: what is the start date of a job?
End date: what is the end date of a job?
Status: status of the job.
Created at: on which date it is created.
.
Manage: you can manage job details from this option.
Click on edit
The following page will display.
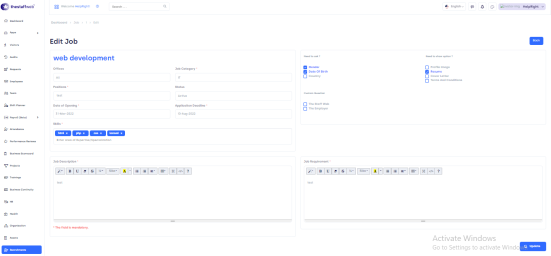
Figure 02.
It has the following option to edit.
.
❖Offices: You can edit office names.
❖Job category: You can modify the job category.
❖Position: If you want to edit the position, click on it.
❖Status: Edit status from this section.
❖Date of opening: You can change the date of opening from here.
❖Application deadline: You can change the application deadline if you want to.
❖Skills: Edit skills from this bar.
❖Job description: If you want to edit, the job description clicks on this button.
❖Job requirement: Make changes in job requirements.
❖Gender: You can edit gender.
❖Date of birth: You can edit your DOB.
❖Resume: If you want to edit your resume, click on this bar.
.
.
Update: if you want to update the form after changes, Click on the update button.
.
How to Create Job:
❖The following page will display.
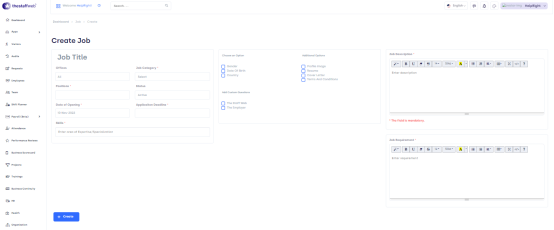
Figure 03.
What is in the form:
.
❖Offices: Enter office name.
❖Job category: Select the job category.
❖Status: Select status from this section.
❖Date of opening: Select the date of opening
❖Application deadline: Add application deadline.
❖Skills: Enter skills from this bar.
❖Job description: The job description
❖Job requirement: Enter job requirements.
.
Create: click on create to create the form.
.
Show Entries: It helps you to see the total number of job entries you want to be displayed on your overview page such as 10, 20, etc.
Page Carousel: Helps to display the number of pages for the total number of jobs it holds.
Search Console: To look for the job using the job title and description.
.
.
Job Board:
.
⮚The following page will display.
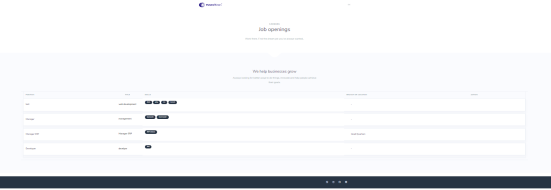
Figure 04.
It has various components that tell about the job description.
.
.
Applicants:
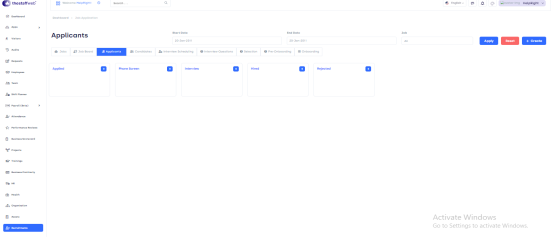
Figure 05.
.
■Start date: Enter the start date of a job application.
■End date: Enter the end date of a job application.
■Apply: Click on this button to apply for a job
■Reset: Click on this button to reset the details.
.
You will get to see the following details about applicants:
.
■Applied: Total number of applicants applied.
■Phone screen: How many phone screens?
■Interview: How many applicants are called for an interview?
■Hired: How many applicants are hired.
■Rejected: How many applicants are rejected?
.
How to create application:
.
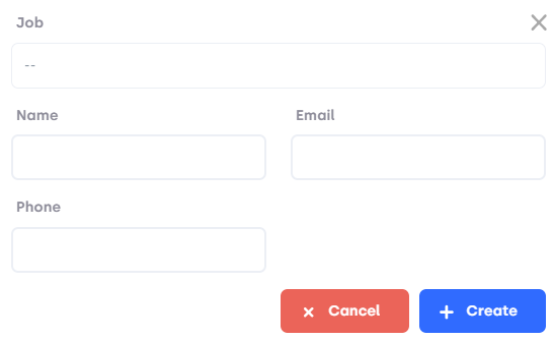
Figure 06.
What is in the form:
⮚Email: Enter your email.
⮚Phone: Add your phone number.
.
Create: If you want to create, click on create.
Cancel: If you want to cancel, click on cancel.
.
Candidates:
.
Click on candidates, you will get to know the candidate’s details.
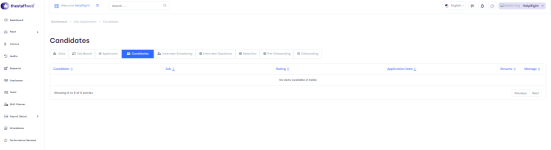
Figure 07.
It has the following details:
.
⮚Candidate: It has a candidate name.
⮚Job: Job title and description regarding the candidate.
⮚Application date: On which date the application is being submitted.
⮚Resume: Resume/CV of the applicant.
⮚Manage: To manage candidate details, click on this button.
.
Interview Scheduling:
.
⮚Click on interview scheduling.
⮚The following details will display.
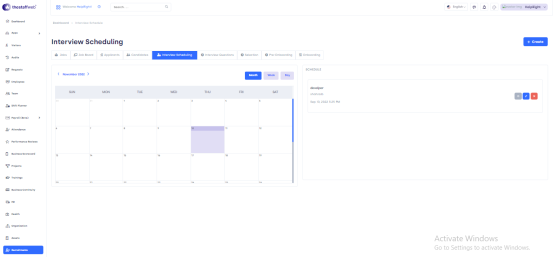
Figure 08.
⮚This page has a calendar on it that shows interview details regarding a month, week, and day.
⮚Also, it has information on a job interview
⮚You can view the details of the interview and edit it.
⮚To edit, click on the edit button.
⮚The following form will come in front of you
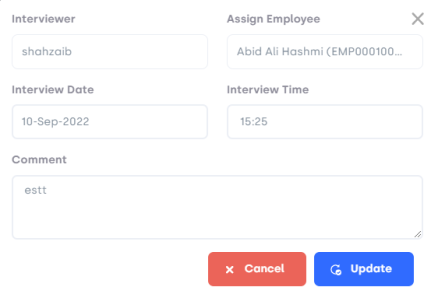
Figure 09.
You can modify the following details:
.
After making changes, if you want to update them, click on update.
If you want to cancel, click on the cancel button.
.
Create an interview Schedule:
✔You will get to see the following form
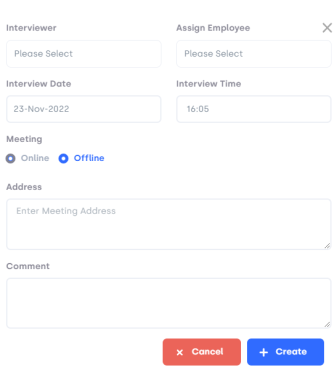
Figure 10.
What is in the Form:
.
❖Interviewer: Enter interviewer.
❖Assign employ: Select Employ.
❖Interview date: Choose an interview date.
❖Interview time: Add interview time.
❖Meeting: Select online/physical mode interview.
.
Create: if you want to create an interview, click on it.
Cancel: if you want to cancel, click on cancel.
.
Interview Questions:
✧Click on Interview Questions.
✧You will get to see the Questions overview page.
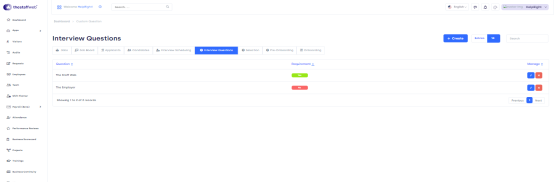
Figure 11.
It has the following options:
.
●Questions: Frequently asked questions.
●Requirements: The correct answer to the question.
.
Show Entries: It helps you to see the total number of question entries you want to be displayed on your overview page such as 10, 20, etc.
.
Search Console: you can search questions and their requirements from this bar.
.
How to create Questions:
●The following form appears:
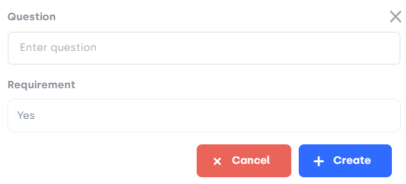
Figure 12.
What is in the form:
.
●Questions: Write questions.
●Requirement: Enter the requirement of the question.
●Create: If you want to create, click on create.
●Cancel: If you want to cancel, click on cancel.
.
Selection:
.
✔You will get to see the list of selected candidates with details
✔It has the following details
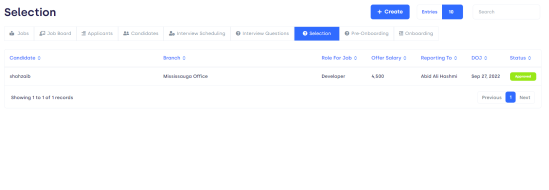
Figure 13.
Candidate: Name of the selected candidate.
Branch: At which branch, a candidate is selected?
Role of job: What is the role of a job?
Offer salary: How much salary is offered to a candidate?
Reporting to: To whom, the selected candidate is reporting?
Date of joining: What is the date of joining?
Status: Is the selected candidate approved or not?
.
Create Selection:
Click on create to see the following form:
Figure 14.
What is in the Form:
.
⮚Candidate: Enter candidate name.
⮚A role for the job: Enter the candidate’s role for the job.
⮚Offer Salary: Enter the salary of the candidate.
⮚Reporting to: Add the person to whom the selected candidate reports.
⮚Date of joining: Enter the date of joining.
.
Create: if you want to create a form, click on create.
Cancel: if you want to cancel, click on the cancel button.
.
Pre-Onboarding:
.
Click on pre-onboarding, you will get to see the following elements.
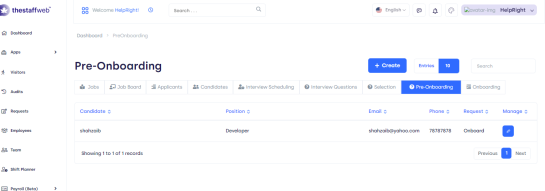
Figure 15.
✧Candidate: Concerned candidate name.
✧Position: Position of the employee in the company.
✧Email: Email id of the employee.
✧Phone: Phone number of concerned employees.
✧Request: Request for employment.
✧Manage: You can view details regarding pre-onboarding from this bar.
.
Create:
✧The following card pops up.
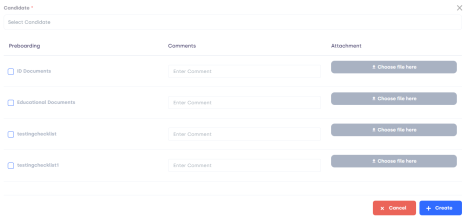
Figure 16.
What is in the Form:
.
Candidate: Enter candidate name.
.
Preboarding:
.
✧ID documents: click on this bar.
✧Educational documents: click on this bar.
✧Testing checklist: click on this bar.
✧Testing checklist 1: Click on this bar.
.
Comments: Add comments regarding ID documents, educational documents, and checklists.
Attachment: Attach required documents such as ID Documents, and educational documents.
.
Create: if you want to create, click on the create button.
Cancel: if you want to cancel, click on the cancel button.
.
Onboarding:
.
■The following details will display in front of you.
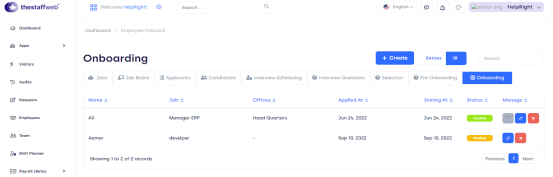
Figure 17.
◆Name: Name of the candidate.
◆Job: Job details of the candidate.
◆Office: Concerned office.
◆Applied at On which date, the candidate has applied.
◆Joining at: On which date, the candidate has joined.
◆Status: The status of the candidate is confirmed/pending.
◆Manage: You can see details, edit and delete with the help of this button.
.
How to create OnBoarding:
.
⮚The following page displays.
.
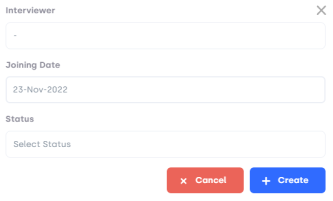
Figure 18.
What is in the form:
.
Interviewer: Select the interviewer.
Joining date: Add joining date.
Status: Update status.
.
Create: If you want to create the form, click on create.
cancel: If you want to cancel, click on the cancel button.
.
.