This feature is helpful for recording visitors’ details as a ‘Visitor Book”. A visitor’s list can be maintained with the date of visit, name, email, phone, purpose, address and time, etc. It is very easy to access.
This manual will help you to understand Visitors’ settings.
Use Case
Say you want to add or you want to edit a visitors list; these settings allow you to do all that stuff.
.
How to access Visitors:
1. Firstly, go to Dashboard > Visitors
2. You land on the visitor’s list overview page. Here you get to see the following features. Let us check them in detail.
.
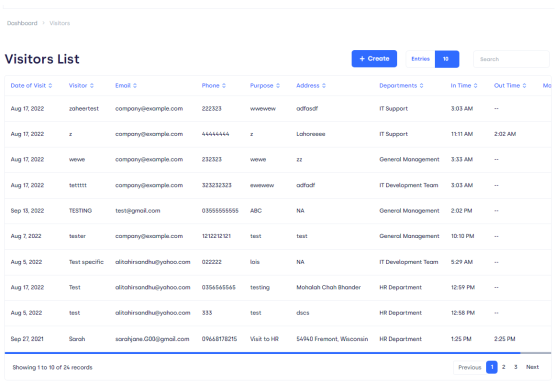
Figure01,
.
A.Show Entries: It helps you to see the total number of visitor entries you want to have on your overview page such as 10, 20, etc.
B.Overview page Taskbar shows you the following elements:
1)date of visit: describes when the visitor has visited.
2)Visitor: tells about the name of the visitor.
3)Email: This section contains the email of visitors.
4)Phone: The Cell number details come under this section.
5)Purpose: It describes the reason for the visit, e.g., company meeting, etc.
6)Address: The address of visitors comes in this section.
7)Department: it tells about the specific department to whom the visit is related.
8)In time: the entry time of visitors.
9)Out time: the exit time of visitors.
.
C. Page Carousel: Helps to display the number of pages for the total number of Visitors it holds.
D.Search Console: To look for the visitor using the name of the visitor, or with the date of visit, etc.
How to create/enter New Visit:
1) Click on Create Button.
2)The Following Card pops up.
.
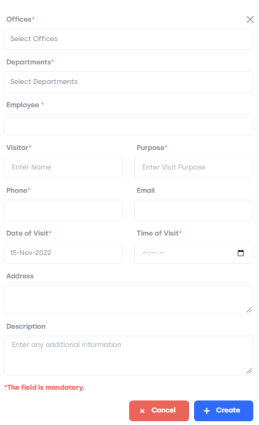
Figure02,
.
What’s In the Form:
✔Offices: Select the type of office such as Toronto/London.
✔Department: Choose the category of the department such as HR/Finance.
✔Employee: Enter your concerned Employee name.
✔Visitor: Enter visitor name here.
✔Purpose: Add a purpose to the Visit.
✔Phone: Enter your Phone Number.
✔Email: Enter your email ID.
✔Date: Select the date of the visit.
✔Time: Choose the time of Visit.
✔Address: Add your address.
✔Description: Add details about the visit, and why you are concerned about the visit.
.
3. Click on Create Button to create/ save a visit for the concerned purpose
4. You will see the added visit appears on the visitor’s list overview page
5. To Manage the visit at a given point in time clicks on manage which you see on the Overview page.
6. The following card will pop up to Edit/Modify Visit details:
.
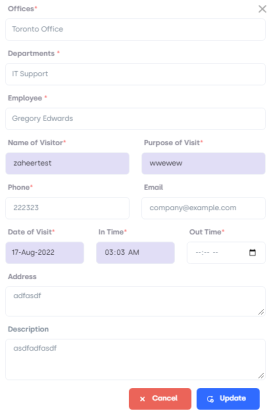
Figure03,
You can add or remove information with this form. It is for visit modifications. After editing, if you want to update that information Click on Update, if you want to Cancel, press the Cancel button.
.
.
.