Attendance shows the regularity and punctuality of employees at the office or specific place. It is used for holding records.
.
How to Access Attendance:
.
⮚Go to Dashboard > Attendance.
⮚You land on the View and Manage Attendance overview page. Here you get to see the following features. Let us check them in detail.
.
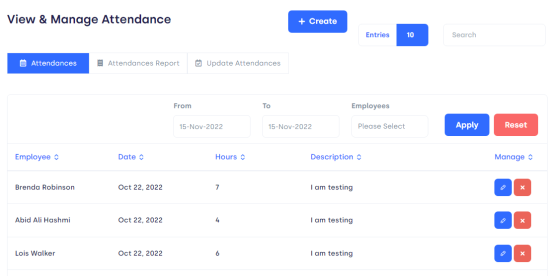
Figure 01,
.
Show Entries: It helps you to see the total number of attendance entries you want to be displayed on your overview page such as 10, 20, etc.
.
The overview page has the following elements:
.
⮚Employee: The Employee whose attendance you want to check.
⮚Date: About the concerned date.
⮚Hour: For a concerned hour.
⮚Description: Employee is present/ absent/ active.
.
Manage:
.
⮚Edit: Edit employee details from this bar.
⮚Delete: if you want to erase already entered information just click on Delete Button.
.
Page Carousel: Helps to display the number of pages for the total number of Attendance it holds.
Search Console: To look for the Attendance using the name of the Employee, or with the concerned date.
.
You can also get attendance details by selecting a date from to, entering the Employee’s name, and then clicking apply. Your details are displayed. if you want to reset typed information, click on Reset.
.

Figure 02,
Create New Attendance:
.
⮚Go to Attendance>Create.
⮚The following card pops up.
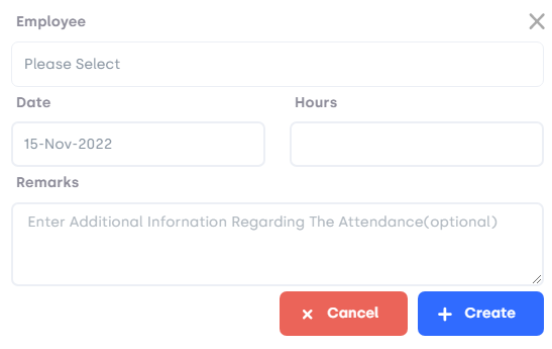
Figure 03,
.
What is in the Form:
.
⮚Employee: Enter Employee name.
⮚Date: Enter the Relevant date
⮚Remarks: Add additional remarks regarding attendance.
.
Create: To create, press the create button.
Cancel: To cancel the form, press the Cancel button.
.
.
Attendances Report:
✔If you want to have a brief attendance report of an Employee.
✔Click on Attendances Report, and you will get the following elements on a page.
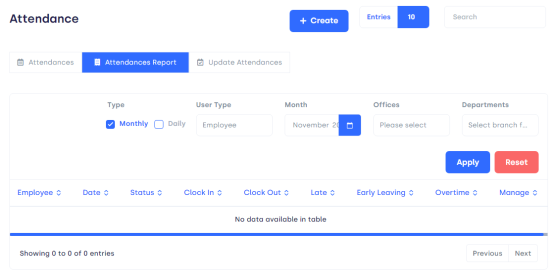
Figure 04,
.
✔Type: Select monthly or daily.
✔User type: Select use/employee.
✔Date: Add the required date.
✔Offices: Enter concerned offices.
✔Departments: Add concerned departments.
Apply: Click on apply button and details of Employee displays.
Reset: if you want to clear the information press Reset.
.
After pressing apply particular Employee Information displays with further details.
.
✔Employee: Employee name.
✔Status: Status of Employee in the office.
✔ Clock-in: Entrance time.
✔Late: Whether the employee is late or not.
✔Early leaving: Has an employee left the office earlier than a fixed time?
✔Overtime: Does the employee have Overtime?
.
Create attendance Report:
✧Go to Attendance report > Create.
✧The following page pops up.
.
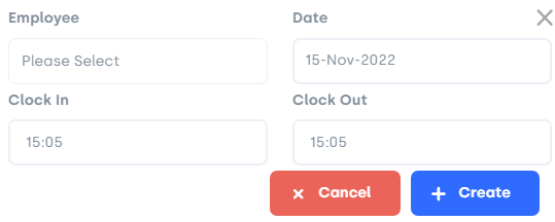
Figure 05,
What is in the Form:
.
✧Employee: Enter Employee name.
✧Date: Add the concerned date.
✧Clock in: Enter entrance time.
✧Clock out: Enter Exit time.
.
Create: if you want to create an attendance report, click on create.
Cancel: If you want to cancel, press the Cancel button.
.
Update Attendance:
.
✧To update attendance, just click on update.
✧The following page shows:
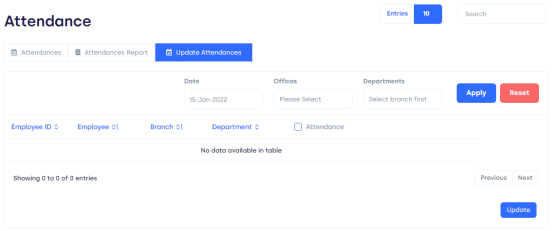
Figure 06,
.
The overview page has various elements that need to be fulfilled for updating Attendance.
.
✧Date: Enter the concerned date.
✧Offices: Add the concerned Office.
✧Department: Enter the relevant department.
.
Apply: If you want to apply then press. And after applying Employee’s ID will be displayed and you can update attendance.
Reset: If you don’t want to apply press this button.
.
.
✧Employee ID: The Relevant Employee’s ID.
✧Employee: Employee Name.
✧Branch: Concerned Branch.
✧Department: Relevant department.
✧Attendance: Mark the attendance.
.
Update: if you want to update Information, click on update.
.
.
.
.
.
.
.
.
.
.
.
.
.
.
.
.
.
.
.
.
.
.
.