How to Edit/Update HR Settings
The Staff Web allows you to edit the HR settings. It also allows you to edit awards, leaves and other settings under HR control.
This article will help you to understand how to edit these settings
Use Case
Say you want to edit awards or leave settings, these settings allow you to do all that stuff.
Let us see how we do it.
How to Access HR Settings
.
●Scroll down Sidebar access Settings > HR
●You land on the Overview page.
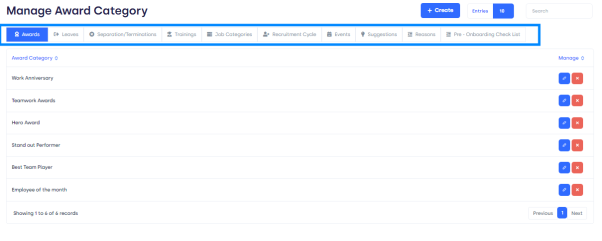
●Here you get to see the following Pages. Let us check them in detail.
.
.
.
●Page Bar: It displays the following pages. The settings you want to change/edit.
Awards Settings: On this page, you can edit/add awards. 5
Leaves Settings: On this page, you can add or edit the leave type.
Separation/Termination Settings: On this page, you can edit/add the termination type.
Training Settings: On this page, you can add or edit training types.
Job Categories Settings: On this page, you can edit/add job types.
Recruitment Cycle Settings: On this page, you can edit the recruitment cycle.
Events Settings: On this page, you can edit/add events.
Suggestions Settings: On this page, you can add or edit suggestions.
Reasons Settings: On this page, you can add or edit reasons.
Pre-Onboarding Checklist Settings: On this page, you can edit/add documents to the checklist.
.
How to Edit/Add Awards
.
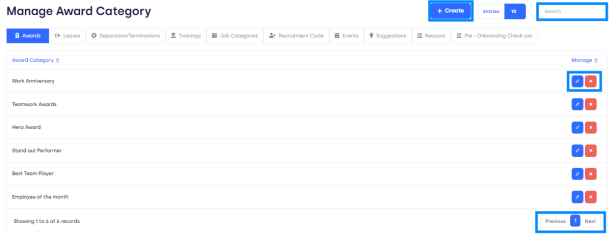
●You will land on the Awards Settings page. Here you will see the following features.
.
.
● Create Button: This button allows you to create a new Award Category. By clicking a form will pop up.

●Award Type Name: In this text bar you will write the title of the award you want to add.
●Create Button: It will allow you to add the award to the list.
●Cancel: This will discard the form.
●Entries: Here you can select the number of entries you want to show on one page.
●Search Bar: Here you can search for specific awards.
●Edit Button: This button allows you to edit awards in the list. By clicking on this icon a form will Pop-Up.

●Award Type Name: In this text bar you will write the updated title of the award you want to add.
●Update Button: It will allow you to update the award in the list.
●Cancel: This will discard the form.
●Delete Button: This button allows you to delete the award from the list.
●Page Carousel: Helps to display the number of pages for the total number of Awards it holds.
.
.
.
How to Edit/Add Leaves
.
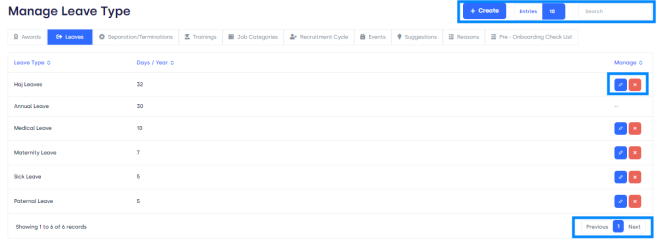
●Select the Leaves Settings page from the page bar. Here you will see the following features.
.
.
● Create Button: This button allows you to create a new Leave Type. By clicking a form will pop up.
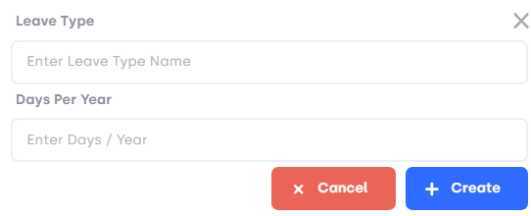
●Leave Type Name: In this text bar, you will write the title/name of the leave you want to add.
●Days Per Year: In this bar, you will select the maximum days of leave allowed on this type, you can select it from the counter on the right side of the bar.
●Create Button: It will allow you to add the leave type to the list.
●Cancel: This will discard the form.
●Entries: Here you can select the number of entries you want to show on one page.
●Search Bar: Here you can search for specific leave.
●Edit Button: This button allows you to edit the leave type in the list. By clicking on this icon a form will Pop-Up.
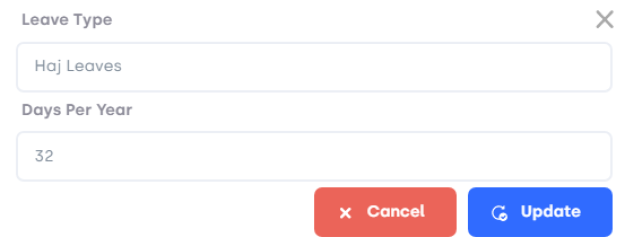
●Leave Type Name: In this text bar, you will write the updated title/name of the leave you want to add.
●Days Per Year: In this bar you will select the updated maximum days of leave allowed on this type, you can select it from the counter on the right side of the bar.
●Update Button: It will allow you to update the leave type in the list.
●Cancel: This will discard the form.
●Delete Button: This button allows you to delete the leave type from the list.
●Page Carousel: Helps to display the number of pages for the total number of leave types it holds.
.
.
How to Edit/Add Termination Type
.
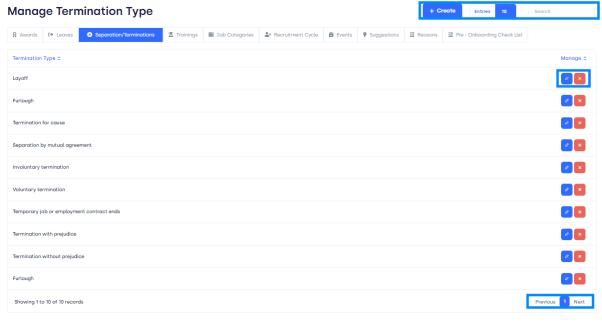
●Select the termination settings page from the page bar. Here you will see the following features.
.
.
● Create Button: This button allows you to create a new Termination Type. By clicking a form will pop up.

●TerminationType Name: In this text bar you will write the title of the termination type you want to add.
●Create Button: It will allow you to add the termination type to the list.
●Cancel: This will discard the form.
●Entries: Here you can select the number of entries you want to show on one page.
●Search Bar: Here you can search for specific termination types.
●Edit Button: This button allows you to edit the termination type in the list. By clicking on this icon a form will Pop-Up.

●Termination Type Name: In this text bar you will write the updated title of the termination type you want to add.
●Update Button: It will allow you to update the termination type in the list.
●Cancel: This will discard the form.
●Delete Button: This button allows you to delete the termination type from the list.
●Page Carousel: Helps to display the number of pages for the total number of termination types it holds.
.
.
.
How to Edit/Add Training Type
.
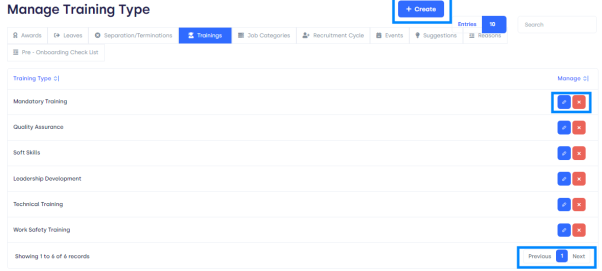
●Select the training settings page from the page bar. Here you will see the following features.
.
.
● Create Button: This button allows you to create a new Training Type. By clicking a form will pop up.

●Training Type Name: In this text bar you will write the title/name of the Training type you want to add.
●Create Button: It will allow you to add the Training type to the list.
●Cancel: This will discard the form.
●Entries: Here you can select the number of entries you want to show on one page.
●Search Bar: Here you can search for specific Training types.
●Edit Button: This button allows you to edit the Training type in the list. By clicking on this icon a form will Pop-Up.

●Training Type Name: In this text bar you will write the updated title/name of the Training type you want to add.
●Update Button: It will allow you to update the Training type in the list.
●Cancel: This will discard the form.
●Delete Button: This button allows you to delete the Training type from the list.
●Page Carousel: Helps to display the number of pages for the total number of Training types it holds.
.
.
.
How to Edit/Add Job Category
.
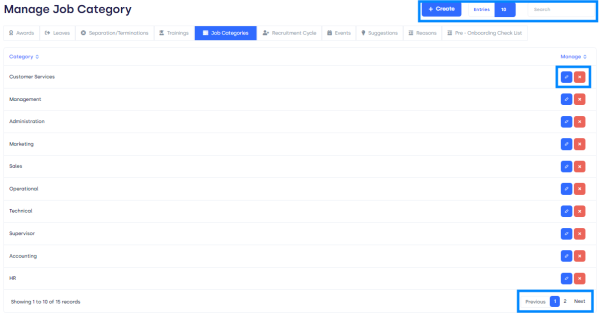
●Select the Job Categories settings page from the page bar. Here you will see the following features.
.
.
● Create Button: This button allows you to create a new Job Category. By clicking a form will pop up.

●Job Category Name: In this text bar you will write the title of the job you want to add.
●Create Button: It will allow you to add the Job Category to the list.
●Cancel: This will discard the form.
●Entries: Here you can select the number of entries you want to show on one page.
●Search Bar: Here you can search for specific Job Categories.
●Edit Button: This button allows you to edit the Job Category in the list. By clicking on this icon a form will Pop-Up.

●Job Category Name: In this text bar you will write the updated title of the Job you want to add.
●Update Button: It will allow you to update the Job Category in the list.
●Cancel: This will discard the form.
●Delete Button: This button allows you to delete the Job Category from the list.
●Page Carousel: Helps to display the number of pages for the total number of Awards it holds.
.
.
.
How to Edit/Add Events
.
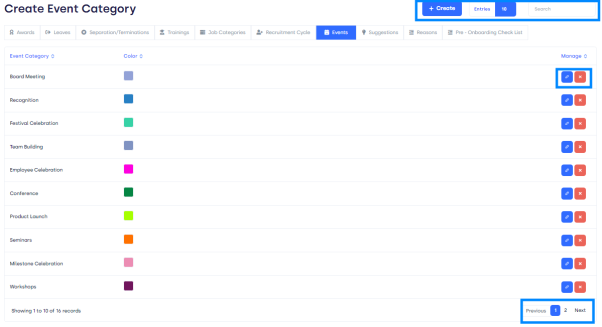
●Select the Events Settings page from the page bar. Here you will see the following features.
.
.
● Create Button: This button allows you to create a new Event Category/Type. By clicking a form will pop up.

●Event Name: In this text bar you will write the title/name of the Event you want to add.
●Colour: In this bar, you will select the colour for the event, you can select it from the colour selector on the right side of the bar.
●Create Button: It will allow you to add the Event Category/Type to the list.
●Cancel: This will discard the form.
●Entries: Here you can select the number of entries you want to show on one page.
●Search Bar: Here you can search for specific Events.
●Edit Button: This button allows you to edit the Event Category in the list. By clicking on this icon a form will Pop-Up.

●Event Name: In this text bar you will write the Updated title/name of the Event you want to add.
●Colour: In this bar, you will select the Updated colour for the event, you can select it from the colour selector on the right side of the bar.
●Update Button: It will allow you to update the leave type in the list.
●Cancel: This will discard the form.
●Delete Button: This button allows you to delete the Event Category from the list.
●Page Carousel: Helps to display the number of pages for the total number of Events it holds.
.
.
.
How to Edit/Add Suggestions
.
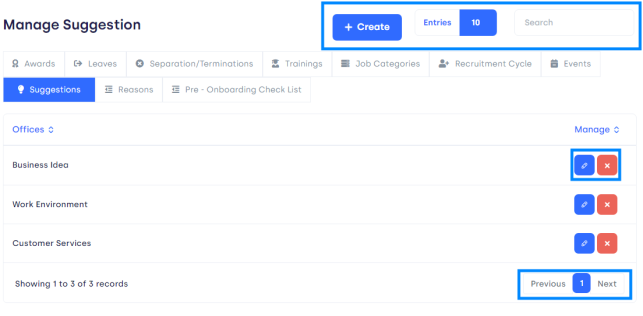
●Select the Suggestions settings page from the page bar. Here you will see the following features.
.
.
● Create Button: This button allows you to create a new Suggestion. By clicking a form will pop up.

●Suggestion Name: In this text bar you will write the title/name of the Suggestion you want to add.
●Create Button: It will allow you to add the Suggestion to the list.
●Cancel: This will discard the form.
●Entries: Here you can select the number of entries you want to show on one page.
●Search Bar: Here you can search for specific Suggestions.
●Edit Button: This button allows you to edit Suggestions in the list. By clicking on this icon a form will Pop-Up.

●Suggestion Name: In this text bar you will write the updated title/name of the Suggestion you want to add.
●Update Button: It will allow you to update the Suggestion in the list.
●Cancel: This will discard the form.
●Delete Button: This button allows you to delete the Suggestion from the list.
●Page Carousel: Helps to display the number of pages for the total number of Suggestions it holds.
.
.
.
.
.
How to Edit/Add Reason
.
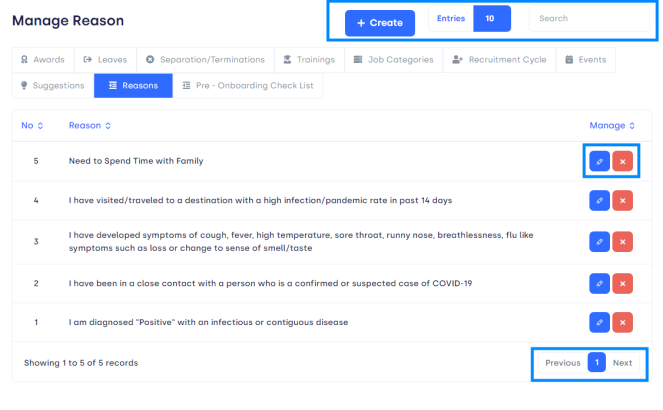
●Select the Reasons settings page from the page bar. Here you will see the following features.
.
.
● Create Button: This button allows you to create a new Reason. By clicking a form will pop up.

●Reason Name: In this text bar you will write the title/name of the Reason you want to add.
●Create Button: It will allow you to add the Reason to the list.
●Cancel: This will discard the form.
●Entries: Here you can select the number of entries you want to show on one page.
●Search Bar: Here you can search for a specific Reason.
●Edit Button: This button allows you to edit the Reason in the list. By clicking on this icon a form will Pop-Up.

●Reason Name: In this text bar you will write the updated title/name of the Reason you want to add.
●Update Button: It will allow you to update the Reason in the list.
●Cancel: This will discard the form.
●Delete Button: This button allows you to delete the Reason from the list.
●Page Carousel: Helps to display the number of pages for the total number of Reasons it holds.
.
.
How to Manage Pre-Onboarding Checklist
.
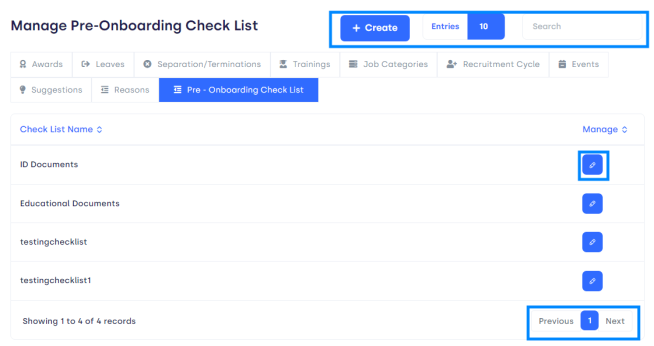
●Select the Pre-Onboarding Checklist settings page from the page bar. Here you will see the following features.
.
.
● Create Button: This button allows you to create a new document in Checklist. By clicking a form will pop up.

●Document Name: In this text bar you will write the title/name of the Document you want to add to the Pre-Onboarding Checklist.
●Create Button: It will allow you to add the Document to the list.
●Cancel: This will discard the form.
●Entries: Here you can select the number of entries you want to show on one page.
●Search Bar: Here you can search for a specific Document.
●Edit Button: This button allows you to edit documents in the list. By clicking on this icon a form will Pop-Up.

●Document Name: In this text bar you will write the updated title/name of the Document you want to add to the Pre-Onboarding Checklist.
●Update Button: It will allow you to update the Document in the list.
●Cancel: This will discard the form.
●Page Carousel: Helps to display the number of pages for the total number of documents it holds.
.
.


